Wednesday, 27 June 2012

HOLIDAY CRAFTS PART 3 - PLASTER OF PARIS!


Plaster of Paris Hearts


These crafts are super easy and super fun!

when mixing the plaster of paris for the hearts you use 2 cups of plaster of paris and 1 cup of cold water, start mixing you will see that the mixture starts of as watery and then starts to become thicker, once all the lumps are out, pour it into the silicone baking mould , leave it for about 5minutes to set alittle, then at the top place a skewer stick or someting like a pencil and let it stand for about 30 minutes or until it is dry. Carefully remove the pencil or skewer that you inserted in to the mould. Then turn the mould around and simply twist off the silicone mould! tada! paint it, the paint a coat of deco varnish or decoupage on it to seal it , rope through some ribbon and you are done!
These hearts are awesom to hang in your garden,in your childs room, or if you have an art wall in your house like i do you can add the new collection on there!

Variations:

You can place your child's hand in the plaster of paris mould, when it is staring to set, once it is dry, you have an awesome print of your childs hand in the heart mould, paint, seal and store in your memory box!


Your child can also do "mosaic"
You simply wait until the plaster of paris has set to a state where it is not runny anymore, but is still a little mushy for the beads to stick to it, just paste the beading to a sticky part of the heart and leave to dry,once it's dry pop it out of the silicone mould and DONE!


ENJOY!!

xx


Tuesday, 26 June 2012

School Holiday Crafts Part 2

Kids Crown


Foil-and-Paper Crowns

Crowns How-To

1. Tear off aluminum foil about 50 cm long. Fold in half twice, long sides together, or cuff; lay cuff with opening toward top.

Fold 50cm-wide tissue paper in half lengthwise twice; lay inside V of the cuff, folded edge up, so bottom edge is just below center of cuff.

2. Fold foil strip in half again, folding up from the bottom (this will hold the tissue in place).

3. Cut flat-topped points in tissue paper, leaving attached at the fold, and decorate with stickers.

4. Overlap ends to proper size, and slip one end of foil inside the other. Tape or glue together.


and TADA!!!

Use pinks and purples, and if you have any of these little stick on jewelery you can add those on there for your little princess!!

Want to get your little one's to start saving some money? Well let them make their own little money bank!!

Money Pig

Bottle Bank

This little piggy (bank) started off at the market as a 2ltr fair cape milk bottle. To make one, rinse an empty bottle with hot soapy water; let dry. Cut features such as eyes, ears, and nostrils from cardboard/scrapbook or normal painted or coloured in paper (ears should have tabs). Attach with double-sided tape, or glue as shown in the picture. Tape patterned paper around body.   empty bottle caps (coke,fanta etc) on for legs. Cut a slot at the top for coins, and a hole in back to insert a pipe-cleaner tail.

Tada!

Enjoy

xxx

Monday, 25 June 2012

School Holiday Crafts Part 1

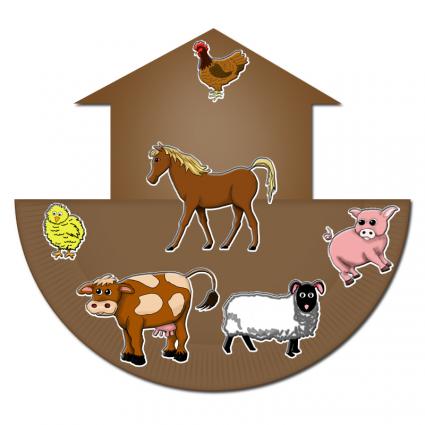
Build Noah's Ark


What You will need:
  • Paper plate
  • Two sheets of brown construction paper
  • Scissors
  • Glue
  • Cotton balls

Instructions

  1. Place the two pieces of construction paper in a stack
  2. Draw a house shape on the top sheet (rectangle for a body and a triangle for a roof).
  3. Cut out the house shape, making sure to cut through both pieces of construction paper simultaneously
  4. Glue cotton balls on the back of one sheet of the construction paper shapes to give it bulk
  5. Glue the two pieces of paper together at the edges. This will make the ark appear full.
  6. Fold the plate in half, creasing it tightly
  7. Cut a slit in the fold in the plate that is wide enough for the house to slip into
  8. Slide the house into the ark's base until only a small piece of the rectangular piece is visible above the plate
  9. Stuff more cotton balls into the plate
  10. Glue the plate shut along its curved edges
  11. Paint the plate brown to match the house shape and to complete the ark.

Wednesday, 20 June 2012

SURVIVING SCHOOL HOLIDAYS 101

finger paint hand print from child craft

Wow!! i cannot Believe that the school holidays are starting in 2 days, for some moms this is something to look forward to, for some moms it is daunting, because we all know keeping our kids busy in the winter comes with a whole lot of challenges not to mention headache tablets and hairgrowth treatments!i know i am one of those moms who by the end of the holiday have almost no hair left and the ones that has'nt been pulled out are in need of colouring because they were left completely grey!!

So to keep the kids happy and the mommy's sane i have decided to for the next 4 or 5 days post ideas for things to keep the little one's busy!

Today i will start of with a few basic diy recipes for a few things that we can use and later on today i will start posting photos and ideas of what crafty things you could do this holiday!

Fingerpaint

1/2 cup cornstarch
3 Tbsp. sugar
1/2 tsp. salt
2 cups cold water
food coloring

Instructions

In a medium pan, mix all the ingredients together to make the finger paint. Cook over low heat 10 to 15 minutes. Keep stirring the finger paint mixture until it is smooth and thick. After the finger paint has thickened take the pan off the stove and let the mixture cool.

After cooling, divide the finger paint into storage containers depending on how many colors you would like. Add a few drops of food coloring to each container. Stir the coloring in to the paint to determine the shade of color. You're ready to finger paint! Cover tightly when storing.

Now For some Glue!!

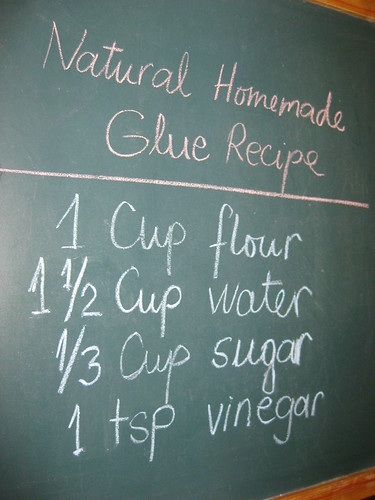
4856861552 6ebc85f116 Homemade Natural Glue


In a saucepan mix 1 cup of flour with 1/3 cup of sugar.
Add half of the water required and mix into a thick paste without clumps.
Pour in the rest of the water and combine till the paste is smooth.
Pour a teaspoon of vinegar and put on medium heat until the mixture starts to thicken.
Cool and transfer to jar or an airtight plastic container.
This glue will keep for a few days. Refrigerate to prolong the shelf life (the jar in my fridge is 6 months old).
Vinegar in this glue recipe acts as a mild natural preservative. You might use grapefruit seed extract or tee tree oil (5-10 drops) instead of vinegar to naturally preserve the glue. Stick with vinegar though if you have small kids – not only is this glue non toxic, but perfectly edible too!
This glue needs more time to dry, but when dried, the bond is really strong.

PLAY DOUGH

How to Make Playdough (Play-doh)

Ingredients
2 cups flour
2 cups warm water
1 cup salt
2 Tablespoons  oil
1 Tablespoon cream of tartar

food coloring
Mix all of the ingredients together, and stir over low heat. The dough will begin to thicken until it resembles mashed potatoes.

When the dough pulls away from the sides and clumps in the center, remove the pan from heat and allow the dough to cool enough to handle.

IMPORTANT NOTE: if your playdough is still sticky, you simply need to cook it longer!
Keep stirring and cooking until the dough is dry and feels like playdough.


Turn the dough out onto a clean counter or silicone mat, and knead vigorously until it becomes silky-smooth. Divide the dough into balls for coloring.

Make a divot in the center of the ball, and drop some food coloring
1 in. Fold the dough over, working the food color through the body of the playdough, trying to keep the colouring away from your hands  You could use gloves or plastic wrap at this stage to keep your hands clean- only the concentrated colouring will color your skin, so as soon as it's worked in bare hands are fine.

Work the colouring through, adding more as necessary to achieve your chosen color.

Play with your playdough- I really don't need to help you there. It's entirely edible, if a bit salty, so it's kid-safe.

When you're done, store your playdough in an air-tight container.
- If it begins to dry out, you can knead a bit of water in again to soften the dough back to useability. Once it's dried past a certain point, however, you'll just have to start over; thankfully it's not terribly difficult.
- If it gets soggy, you can re-heat it to drive off the extra water the dough absorbed overnight. This is usually the result of high humidity, but is fixable!

You can also bake it in the oven to make hard dough figures and ornaments, then paint or otherwise decorate the surface.

Till next time
xx

Wednesday, 13 June 2012

KID'S PARTIES ON A BUDGET!

oki doki, so for a while now, i have been reading on other people's pages about what to do when you have a big heart but a small wallet...and then i just got a bucket full of ideas chucked straight at me this morning! So this one is for all the mom's with kiddies who would like to throw a million buck splash for a R1000 !! Enjoy!

Okay so first things first Theme!

Choose a theme that won't break the bank, if your baby is turning one, this will be easy, as they cannot voice their opinion as strong as a ben 10 crazy 6 year old lol!

then decide on the colour, normally pastels are always a winner with little one's, now if you could find a R5 store in your town, and i think most of you can, go on and buy the small paper plates they are about R14, in a plain colour, then place a themed serviete on top of it and place the " party pack " on top of that!
In the middle of the table you place one bowl of cheese curls, an empty coffee tin with a coloured ribbon tied in a bow, in the coffee tin you place marshmallows on a stick, marie biscuits with a half a marshmallow melted inbetween with decorated icing on top can also be placed in a plate, you can also put mini pizza slices on a plate for the kids party table and then you can make cupcakes and tower that on the table as well, this is MORE than enough!.

Inside the party bag you put 1 packet of cheese curls, 1 oros bottle juice, 1 marshmallow string, and a packet of jelly babies or you can just have a "thank you table with sweets in bowls and the mom can choose a few "goodbey" treats to take home.

all along the middle between the bowls with treats you place more decorated tins and inside of them you put balloon stick with balloons on them just to brighten up the table!
If you do not have table cloths in reds or blues or pinks or even whites, use a single bed sheet:-)

streamers are a mess to clean up and you can never really reuse them, so buy cheap ribbon and hang balloons from them:-)

you can make an activity table with colouring pictures and crayons, another table with clay and another with puzzles! these are things that i think most kids already have so you don't need to go buy it!

If you choose to have  the party bag you can do the following:
* Get brown paperbags and decorate them with a single picture of your theme and with a Permanent marker write each kids name on it

* go to spar and ask them if they can sell you 10 of their little cake boxes and decorate it when you   
   get home.

* Go to the R5 store and if you can get small gift bags, get those and place the thingies in there!


For the adults it is Very easy if you feel you HAVE to cater to the adults bake a chocolate cake for dessert, and serve hotdogs or hamburgers that you make yourself! It's not about the parent but the kids, i had 8 years to learn that the adults are normally the expensive part of a party and therefore i let them know that there won't be a big buffet for them!

And last but not least Use the internet for ideas, just because ideas look expensive it doen't mean it has to be, most of the things you see on the party ideas websites can be made by yourself!

here's a few pic's to help you with ideas!

Happy planning, happy party'ing and enjoy!

Till next time xx


p

Monday, 11 June 2012

the life of a secretbloggingmom

the life of a secretbloggingmom
So After almost a month of very bad bronchitis and a good dose of self pity i am back to finish what i started :-)

Today i just want to do a quick reality check post, while i was sick this month or so, i realised how much i actually do have to be thankful for, yet when we go through our everyday routines those blessings seem so far away and it isn't that difficult to forget how much we have, i read something the other day and it hit me in the face like a 3 ton brick i would like to share it with you and hopefully it would have the same effect on anyone who like myself, tend to go through a phase where gratefulness sometimes go on the back burner.

" What if you woke up tomorrow, and all you had left was what you thanked the Lord for Last Night"

WOW, powerful words, and yet so very very true, don't you think?

We live in a time where if  a mom  has the gift of giving her hungry child a warm plate of food, she is blessed.

I mean we see so many times on TV mom's that looks like life has given them a beating, it looks as if they themselves have not had anything to eat in days, images of a mom holding on to her starving baby giving them the only comfort that a mom with no food,money or ability to care for her child can. It is easy for us to point a finger and judge, it is easy for us to say if you can't afford a child then don't have one, but we do not have any idea of the situations in other areas of the world, other believes, other ways of doing things around the world.

We live in a country where we as mothers have rights. we have the right to work, we have the right to be loved by one man only if we choose to do so, there are countries in the world were children of 12 become mothers and wives and it is acceptable?

Blessed is a mother that can tuck her child in with a warm blanket, protected from the cold, harsh elements that is held within cold dark winter's  night. because we see so many mothers in countries where disasters struck, tsunami's , hurricanes and although donations are made world wide, these mothers has to somehow keep their children warm until those donations arrive.

Blessed is a mother that has the joy of holding her child in her arms, protecting, loving, reading stories, spending time, laughing, cuddling LOVING that bundle of joy, because there's mom's that has to say goodbye to a baby that has never had the chance to be held, loved or kissed before passing away, there are mothers that has to say goodbye to a child that she had so many dreams for, so many plans for, yet we have the privilege of saying goodnight to our kids.

Blessed is a mother who knows exactly where her kids are today, there are so many mothers who's children has been kidnapped,murdered,sold as child prostitutes and the eternal search of a mother for her child will never fade, they will always wonder with absolute fear where is my child, is she/he hungry, cold, alive?

Blessed is a woman, who has a husband that Love's her, cares for her, looks after the household financially the best he can, because somewhere tonight is a woman who is being raped,battered, emotionally abused and treated as possession with no rights and she has no where to go, no one to turn to.

My point with this whole blog is not to upset anyone, but to make just 1 person realise what i realised, that life is short, it's a blessing, it comes with ups and downs, but at the end of all trials and tribulations your family and kids are what pulls us through gives us purpose, keeps us alive, what a privilege it is!

From today i will hug my child 3 seconds longer, say i love you 2 times more, protect him 4 times harder and appreciate him infinity time infinity and back!

xx